AX1675
Perform production reporting for web reports using multipass processing. Process the report multiple times over a dimension, generating a filtered PDF or Excel copy of the report for each value of the dimension. Save the report copies to a designated location and/or emailed to designated recipients.
To perform multipass processing on a web report, use the Scheduler task Web Report Processing. When you set up this task, configure the following:
-
The web report to process. Process any web report created from a product-delivered template.
-
The output format of the processing. Each pass generates a filtered PDF or Excel output file. Set the filename dynamically using processing variables and job variables.
-
The delivery option for the processing. Save each output file to a folder location, emailed to a recipient, or both.
-
If you save the output, specify the location of the target folder (local or Axiom repository) and the folder path. Set the folder path dynamically using processing variables and job variables.
-
If you email the output, specify the recipients of the email, and the email subject and body text. Manually enter the recipients into the task settings (or optionally use job variables) or specify a table column to dynamically look up the recipients. Recipients can be email addresses or you can list user and role names to look up email addresses from Axiom security. Set the email subject and body text dynamically using processing variables and job variables.
-
-
The dimension to process. Specify any dimension that is compatible against the data queried in the target web report. The web report is processed once for each value in the dimension. If preferred, define a filter to limit the dimension values to process.
Configure a web report processing task
To create a Scheduler job with a Web Report Processing task, you must be an admin or a user with the Scheduled Jobs User permission. You must also have read/write access to at least one folder in the Scheduler Jobs Library to save the job. You can only create Scheduler jobs in the Desktop Client General term for using either the Excel Client or the Windows Client, both of which are installed to the user's desktop..
-
On the Axiom tab, in the Administration group, click Manage > Scheduler.
NOTE: In systems with installed products, this feature may be located on the Admin tab. In the System Management group, click Scheduler.
-
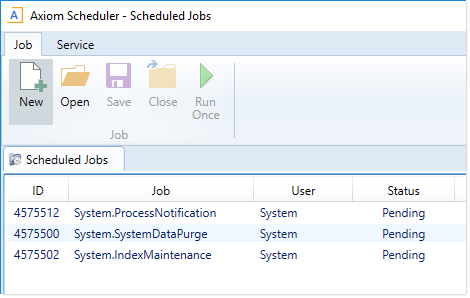
In the Scheduler dialog, on the Job tab, click New.
-
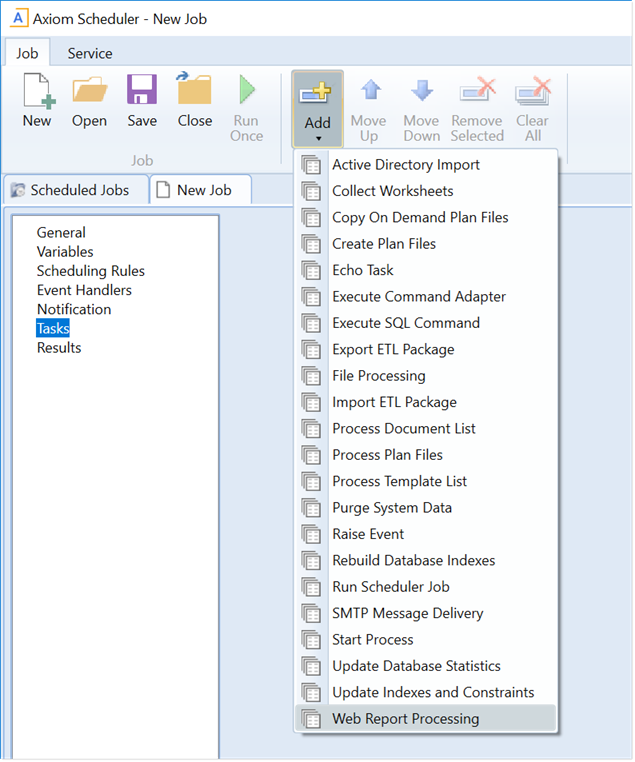
Select the Tasks section of the job, and then on the Job tab, click Add > Web Report Processing.
-
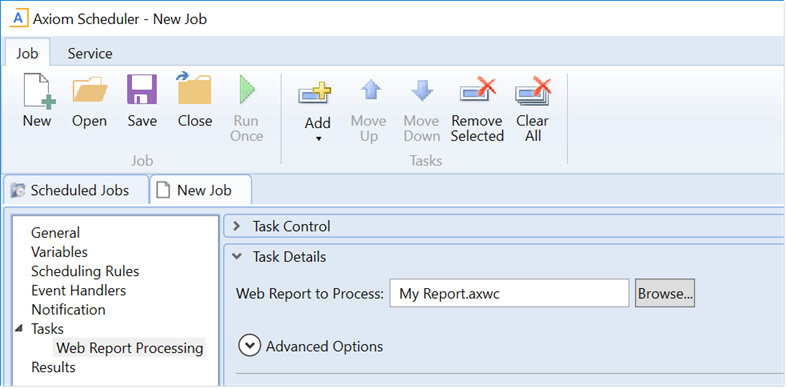
Select the Web Report to Process. This is the report for processing by the task.
- Click Browse to open the Axiom Explorer dialog.
- Go to the web report to process, and then select the report and click Open.
The selected report is listed in the Web Report to Process box.
IMPORTANT: Only web reports you create from a product-delivered template can be processed. The Axiom Explorer dialog is filtered to only show reports that were created from a template.
-
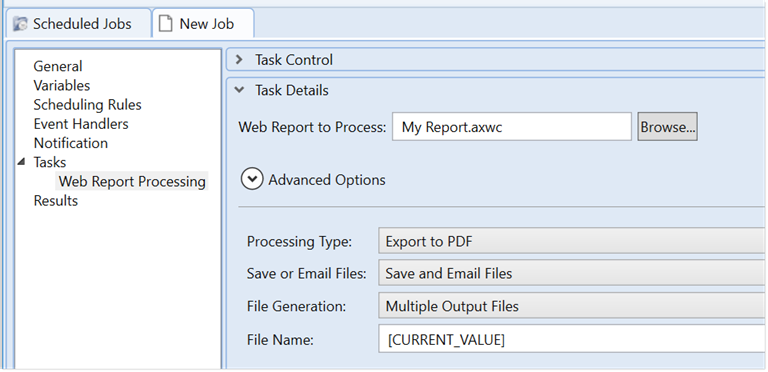
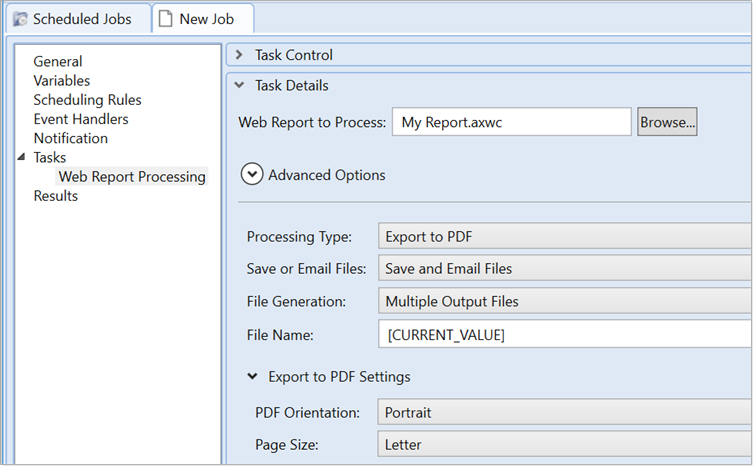
Complete the general processing properties that determine the processing type and the output:
Item Description Processing Type Select one of the following to determine the output format of each pass:
- Export to Excel (default): The contents of the report are exported to a spreadsheet (XLSX) file. The output uses the same behavior as when you export to spreadsheet while viewing the web report.
- Export to PDF: The report is saved as a PDF file. The output uses the same behavior as when you save to PDF while viewing the web report.
Save or Email Files Select one of the following to determine the delivery method for the output:
- Save Files (default): The output files are saved to the specified output folder.
- Email Files: The output files are emailed to the specified recipients. The output files are not saved anywhere on the file system.
- Save and Email Files: The output files are both saved and emailed.
File Generation
Select one of the following to determine whether the output is saved as a single file or multiple files:
- Multiple Output files (default): The results of each pass are saved as individual output files. For example, if the multipass settings result in 10 passes, 10 output files are created (one file for each pass).
-
Single Output File: The results of each pass are collected into a single output file. For example, if the multipass settings result in 10 passes, the results of all 10 passes are placed in a single output file.
If the output type is Excel, each pass is a separate sheet in the Excel file. If the output type is PDF, the PDF for each pass is combined into one large PDF file.
File Name
Specify how the output file (or files) should be named. You can do the following:
- Use processing variables and/or Scheduler job variables to generate dynamic filenames.
-
Enter a filename.
If the task generates multiple output files, the filename (or the output folder path) must use a processing variable so that the output of each pass is unique. If the task will generate a single output file, variables are not required.
To use a processing variable, enter the variable or click the pencil icon
 to open a text editor. From the Insert Variable list, select the variable to use.
For example, you could set the filename to
Income Statement [Current_Value]. If the report is being processed by region to multiple output files, this generates filenames, such asIncome Statement West,Income Statement East, and so on (where East and West are region names).NOTE: Processing variables and Scheduler variables use different syntax. Processing variables are enclosed in square brackets. Scheduler job variables are enclosed in curly brackets.
Sheet Name
Specify how the sheet for each pass is named. This property only applies when the processing type is Export to Excel. You can do the following:
- Use processing variables and/or Scheduler job variables to generate dynamic sheet names.
-
Enter a sheet name.
If the task collects all of the output into a single spreadsheet file, the sheet name must use a processing variable so that the output of each pass is unique. If the task generates multiple output files, variables are not required.
To use a processing variable, enter the variable or click the pencil icon
to open a text editor. From the Insert Variable list, select the variable to use.For example, you could set the sheet name to
[Current_Value]. If the report is being processed by region, this generates sheet names such asWest,East, and so on (where East and West are region names).NOTE: Processing variables and Scheduler variables use different syntax. Processing variables are enclosed in square brackets. Scheduler job variables are enclosed in curly brackets.
- Export to Excel (default): The contents of the report are exported to a spreadsheet (XLSX) file. The output uses the same behavior as when you export to spreadsheet while viewing the web report.
-
Depending on the selected processing type (PDF or Excel), complete the properties specific to that processing type:
Export to PDF settings
Item Description PDF Orientation
Select the orientation for the PDF, either Portrait or Landscape. Portrait is the default orientation.
Page Size
Select the page size for the PDF. Choose from the following standard page sizes: A3, A4, A5, Legal, Letter, or Tabloid. Letter is the default size.
Export to Excel settings
Item Description Include Column Headers
Specifies whether column headers are included in the file output. By default this is set to On, which means column header text is included in the first row of the spreadsheet. Column grouping headers and multi-row headers are not included.
If this option is set to Off, column headers are omitted from the file output and the data starts in the first row of the spreadsheet.
Include total row
Specifies whether the total row is included in the file output. By default, this is set to On, which means that the total row is included in the spreadsheet.
If this option is set to Off, the total row is omitted from the file output.
NOTE: This option only applies when the web report being processed is a dynamic row report with the total row enabled. If the web report being processed uses a fixed row structure, the total and subtotal rows defined in the fixed row structure are always included in the spreadsheet.
-
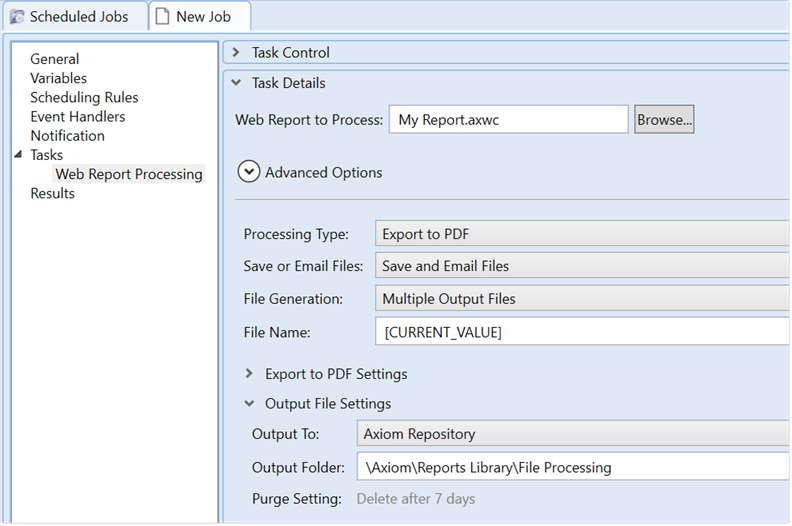
If the processing is set to Save Files or Save and Email Files, complete the Output File Settings:
Item Description Output To
Select one of the following:
- Local File System (default): The output location is outside of Axiom Budget Planning and Performance Reporting to a location on your local network share. The specific path is described in the Output Folder setting. Access to output files is not controlled by Axiom Budget Planning and Performance Reporting.
- Axiom Repository: The output location is the Axiom Budget Planning and Performance Reporting file system within the Reports Library. The specific path is detailed in the Output Folder setting. Access to output files is controlled by security access to the designated folder within Axiom Budget Planning and Performance Reporting.
Output Folder
Specify the folder location for the file output. Enter a folder path or click the folder icon to browse to the folder location. The browse dialog shows either your local file system or the Axiom file system depending on what you selected for Output To.
Make the output folder dynamic as follows:
-
If File Generation is set to Multiple Output Files, use processing variables in the output folder path. For example, include
[Current_Value]in the output folder path and this is replaced with the current multipass value. Processing variables are invalid in the output folder path if you configure the task to generate a single output file. -
Use Scheduler job variables in the output folder path.
NOTE: Processing variables and Scheduler variables use different syntax. Processing variables are enclosed in square brackets. Scheduler job variables are enclosed in curly brackets.
Local file system
Enter the output folder location as a UNC path. It must be accessible by the Scheduler service user account (for on-premises systems) or the Axiom Cloud Integration Service (for cloud systems).
Saving files to the specified location and accessing them after saving is controlled by local network security.
Axiom repository
The specified location in the Axiom file system must be within the Reports Library and the location must use the full path (meaning:
\Axiom\Reports Library\...). Saving files to the specified location and creating new folders, if necessary, depends on the Axiom Budget Planning and Performance Reporting security permissions for the user processing the file. Users can only create new folders if they have read/write permissions to the parent folder and they can only create new files if they have read/write permissions to the target folder.After the files are created within the Axiom file system, access to those files depends on the user's permissions to the output folder. Typically, you create the output folder in advance (or if you want to create output folders on-the-fly, create a parent folder to hold the output folders) and then set permissions for that folder, as appropriate, in Axiom Budget Planning and Performance Reporting security so that the appropriate users are able to access the files after they are created.
Remote Data Connection
This option only applies when you save the file output to your local file system and only for Axiom Cloud systems that are using remote data connections.
Select the name of the remote data connection to use for the file processing operation. The designated remote data connection is used to access the local file system and save output file(s) to the designated location.
A remote data connection is required to save files locally from an Axiom Cloud system.
Purge Setting
This option only applies when the file output is being saved to the Axiom Repository.
If you want the file output to be automatically deleted after a specified period of time, click the pencil icon
to open the Choose Date dialog.- No purge date (default): File output is not automatically deleted.
- Static purge date: Select a specific date after which the output is deleted.
- Relative purge date: Specify a number of days to keep the output after it has been generated. The output is deleted after the specified number of days have passed.
For more information, see Automatically delete file output generated by file processing.
-
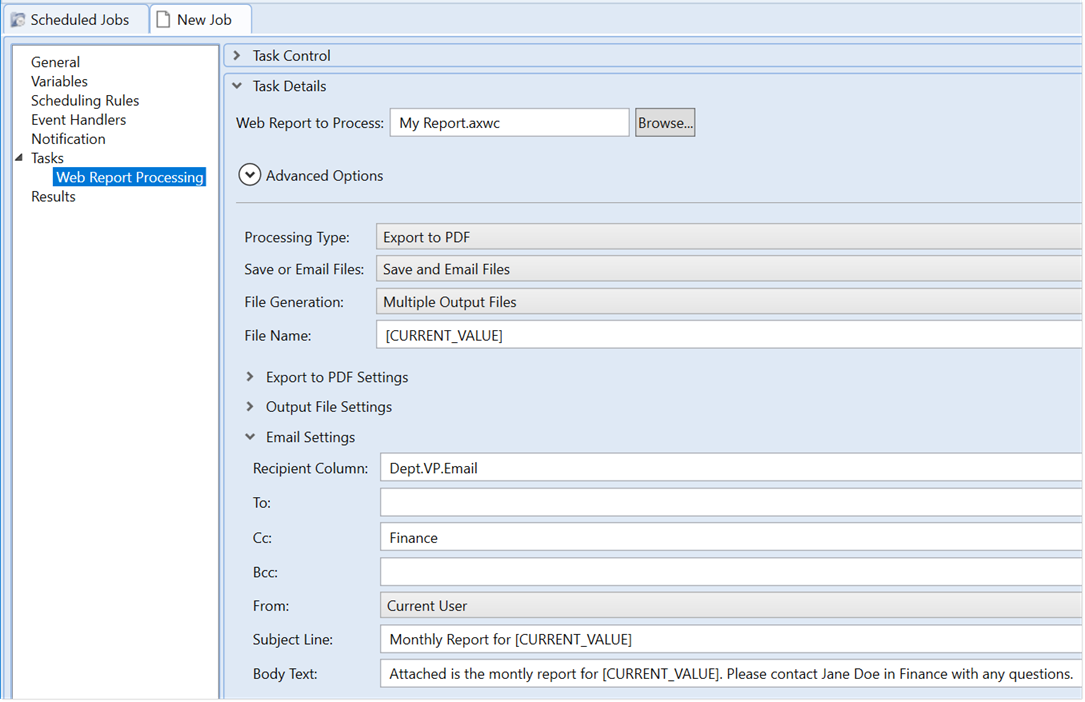
If the processing is set to Email Files or Save and Email Files, complete the Email Settings:
Item Description Recipient column
Optional. Specify a table column that holds the preferred email recipients for each pass. This option only applies if File Generation is set to Multiple Output Files, so that each pass is sent a separate email.
You can enter the name of a table column or click the column button
 to select a column from the multipass table or a lookup table. (You must select a multipass column first before you can use the column button to select a column.) For example, if the multipass column is Dept.VP, the recipient column might be Dept.VP.Email.
The specified column can contain any of the following: email addresses, user login names, and/or role names. The column can contain multiple values separated by a semicolon. The recipients listed in the column are used as the To address for the email (in addition to any recipients listed directly in the To field). If the column contains a user login name, that user's email address as defined in security is used. If the column contains a role name, the email is sent to all users in the role.
To verify that the recipient column resolves as you expect for each pass, click Preview Multipass List in the Multipass Data Settings section. The specified recipient column appears in this preview so that you can see the recipient column values associated with the multipass column values.
NOTE: The recipient column must have a one-to-one relationship with the values in the specified multipass column.
To
Specify the To recipient(s) for the email. This is required if you do not specify a recipient column. If you specify a recipient column, the recipients listed are added to the recipients listed in the column for each pass.
You can enter one or more email addresses, user login names, and/or role names. Separate multiple recipients with semicolons. If a user login name is listed, that user's email address as defined in security is used. If a role name is listed, the email is sent to all users in the role.
NOTE: If File Generation is set to Multiple Output Files, the recipients in the To field receive a separate email for each pass. The only way to dynamically send the emails to different recipients per pass is to use the Recipient Column option.
CC
Optional. Specify the CC recipient(s) for the email. This field follows the same rules as the To field.
BCC
Optional. Specify the BCC recipient(s) for the email. This field follows the same rules as the To field.
From
Select one of the following to specify the From address for the email:
- Current User: The email is sent from the user who runs the Scheduler job.
- System User: The email is sent from the designated From user for Scheduler. This is the same value returned by the
{Scheduler.FromEmailAddress}job variable.
Subject Line
Enter the subject line for the email. Use processing variables in the subject line when File Generation is set to Multiple Output Files.
To use a processing variable, enter the variable or click the pencil icon
to open a text editor. From the Insert Variable list, select the variable to use.For example, you could set the subject line to
Monthly report for [Current_Value]to include the current pass value in the subject line.Body Text
Enter the body text for the email. Use processing variables in the body text when File Generation is set to Multiple Output Files.
To use a processing variable, enter the variable or click the pencil icon
to open a text editor. From the Insert Variable list, select the variable to use.Use Scheduler job variables in any of the email settings except the From setting.
-
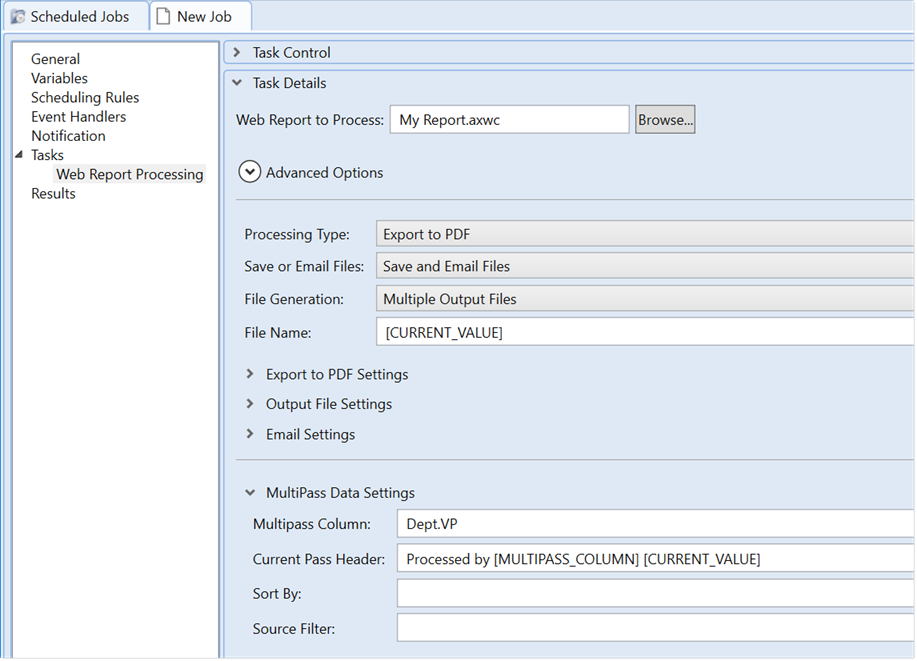
Complete the multipass settings for processing:
Item Description Multipass Column
Specify the column to use for multipass processing. Enter a Table.Column name or click the column icon
to select the column from a dialog. Select any column on a data or reference table, though typically processing is performed by a dimension such as Dept.Dept or a grouping such as Dept.Region.The report is processed once for each unique value in the specified column (except for any values excluded by the Source Filter). A filter is applied to the data query in the report so that the data is limited to the current pass value. For example, if you are processing by Dept.Dept, the report is processed once for each department and the report data is limited to only the data for that department.
Know the difference between processing by a data table column, such as GL2023.Dept, versus a dimension table column, such as Dept.Dept. When processing by GL2023.Dept, the report is processed by each department with data in the GL2023 table. When processing by Dept.Dept, the report is processed by each department in the Dept table.
To verify the list of values for processing, click Preview Multipass List to view the list of items. The first 100 values appear in the order they are processed. If the task configuration includes a Recipient Column (in the email settings) or a Sort By column, these columns also appear in the preview.
Current Pass Header
Optional. Define a header to display in the report output file. This option only applies if the processing type is Export to PDF.
Use processing variables for the current pass header to show information about the current pass. To use a processing variable, enter the variable or click the pencil icon
to open a text editor. From the Insert Variable list, select the variable to use.For example, define a header such as:
Processed by [MULTIPASS_COLUMN] [CURRENT_VALUE]
When processing by Dept.Dept, this resolves to something like Processed by Dept 22000
By default, if the current pass header is left blank, the PDF output does not include a header to indicate the current pass information. However, it is possible that the template used to create the report may have been designed with a dynamic header that shows this information.
Sort By
Optional. Specify one or more sort columns for the list of multipass values. Enter a Table.Column name or click the column icon
to select the column from a dialog. Optionally, also specify AscorDescafter the column name (ascending order is used if not specified). For example,Dept.Dept Desc. Separate multiple values with semicolons.By default, the values are sorted by the multipass column in ascending order. Only use the Sort By field if you want the values to be sorted in descending order instead, or if you want the values sorted by a different column in the same table.
The processing order is only relevant when File Generation is set to Single Output Filebecause it determines the order of each individual pass within the single file. When outputting to Multiple Output Files, the order is still used during processing but it has no useful impact on the outcome.
Source Filter
Optional. Specify a filter to limit the multipass list of items. Enter a filter or click the filter icon
 to use the Filter Wizard.
When the multipass list of values is generated, any value that does not meet the source filter is excluded from processing.
By default, all values in the specified multipass column are processed if you leave the source filter blank.
Use Scheduler job variables in any of the multipass settings.
-
Complete the remaining task and job settings, as preferred. For more information, see the Scheduler documentation. Note the following:
-
Generally speaking, only modify the Advanced Options appearing at the top of the Web Report Processing task as advised by Axiom Support.
-
To schedule the job for running at a later date and/or time, including setting up recurring runs, use the Scheduling Rules section of the job.
-
To use Scheduler job variables in any task settings, define these variables in the Variables section of the job.
-
Review the Notification settings for the job and adjust them, as needed. By default, Scheduler jobs are configured to send an email to the user who ran the job when the job completes, regardless of the job status.
-
- On the Job tab, click Save to save the job.
- In the Axiom Explorer dialog, select a folder location in the Scheduler Jobs Library and define a name for the job, and then click Save.
If the job settings included an active scheduling rule, this rule is evaluated when the job is saved and the next scheduled run is added to the Scheduler job queue.
Run web report processing
After setting up a Scheduler job with a Web Report Processing task, run the web report processing by running the Scheduler job. Run Scheduler jobs on demand by using the Run Once feature within Scheduler or schedule the job for a future run by defining and saving a scheduling rule in the job. Also, run Scheduler jobs on demand using RunEvent, such as to kick off the Scheduler job from a custom task pane, Axiom form, or spreadsheet Axiom report.
When web report processing is run, the following occurs:
- The list of multipass values to process is obtained using the Multipass Column limited by the Source Filter, sorted in the default or specified sort order.
- The specified report is processed once for each value in the multipass list.
- The report data query is filtered by the current pass value and the report data is refreshed.
- A PDF or Excel copy of the report is generated, depending on the specified Processing Type.
- If the File Generation is Multiple Output Files, the output file for each pass is saved and/or emailed according to the task configuration.
- If the File Generation is Single Output File, the result of each pass is saved in temporary storage and then merged into a single file after all passes are complete. This single file is then saved and/or emailed according to the task configuration.
Each pass of multipass processing can succeed or fail independently without affecting the other passes. For example, imagine the multipass list has 10 items. Pass 1 fails because the specified recipient column does not contain a valid email address, username, or role for the pass 1 value. This pass-level failure does not stop passes 2-10 from being processed. The job status reports partial success in this case.
A Scheduler job can contain multiple Web Report Processing tasks followed by a File Processing task to collect the various output files into report books, and then save and/or deliver the collected books. For more information, see Set up file collect with web report processing.
Use processing variables
Use the following processing variables in various settings within the Web Report Processing task to dynamically change the setting using information for the current pass.
| Item | Description |
|---|---|
|
[CURRENT_VALUE] |
This variable returns the current multipass processing value. For example, if you are processing by Dept.Dept, and the current pass is for department 20000, the variable is replaced by the value "20000" for this pass. This variable is typically used in settings such the filename, sheet name (when generating Excel output), and folder path. |
|
[CURRENT_PASSNUMBER] |
This variable returns the current pass number. For example, if the current pass is number 20 of 35 passes, the variable is replaced by the value "20" for this pass. |
|
[MULTIPASS_COLUMN] |
This variable returns the name of the multipass column. For example, if you are processing by Dept.Dept, the variable is replaced by the value "Dept" for all passes. Use this variable to reference the name of the dimension processed. For example, instead of just referencing the current value in the filename, you might want to reference the column name and the value. A variable construction like |
You can only use processing variables in certain settings, and sometimes only when the output is multiple files (versus a single file). See the documentation for each individual setting to determine if processing variables are supported in that setting.
NOTE: Processing variables and Scheduler variables use different syntax. Processing variables are enclosed in square brackets. Scheduler job variables are enclosed in curly brackets.
Use Scheduler job variables in task settings
Use Scheduler job variables in any Web Report Processing task setting that you can directly enter content, such as the filename, sheet name, folder path, and various email settings. To use a Scheduler job variable, you first define the variable on the Variables tab of the job, and then enter the variable in the preferred setting using curly brackets. For example, if the variable name as defined on the Variables tab is columnname, enter {columnname} in the task setting. When the job is run, the variable in curly brackets is replaced by the current value of the variable.
Scheduler job variables are useful when you want a task setting to change dynamically based on a variable value that gets passed to the Scheduler job. Various processes in Axiom Budget Planning and Performance Reporting can trigger a Scheduler job for running and pass variable values to the job. Additionally, previous tasks in the job can set a variable value that is then passed to subsequent tasks in the job.
NOTE: Processing variables and Scheduler variables use different syntax. Processing variables are enclosed in square brackets. Scheduler job variables are enclosed in curly brackets.
Use Scheduler job variables to pass refresh variable values
If the web report uses refresh variables, use Scheduler job variables to pass variables to these variables. For example, in some cases, the report may require you to set certain refresh variables before data can be queried. In this case, the Scheduler job must pass values for these required refresh variables. The refresh variables are used to refresh data for each pass, in addition to the multipass filter for the current pass.
To pass a Scheduler job variable value to the report as a refresh variable value, special syntax is used for the job variable:
ReportVariable.VariableID
where ReportVariable is a dedicated keyword that tells processing to apply the variable as a report parameter and VariableID is the name of the specific report parameter.
For example, the report may contain a refresh variable that specifies the grouping level (row dimension) of the report. This refresh variable takes values, such as Dept, WorldRegion, Country, and so on.
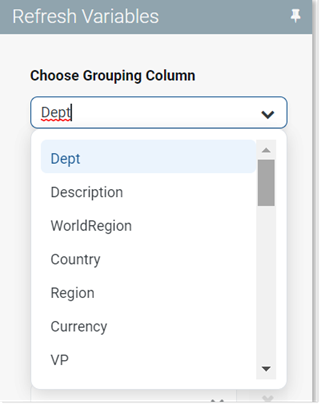
In this example, the ID of this refresh variable is groupingColumnVar. Therefore, to pass a value to this refresh variable, use a Scheduler job variable named ReportVariable.groupingColumnVar. You must assign a value to this variable that exactly corresponds to a value that you can select for the refresh variable within the Refresh Variables pane.
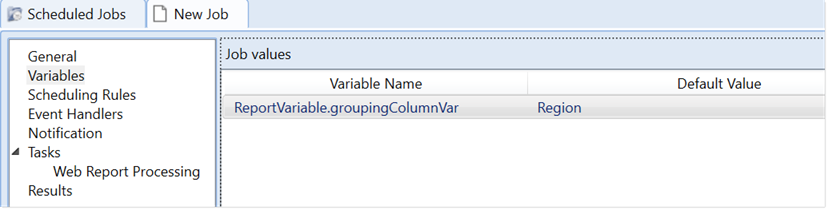
When this report is processed, the value for this refresh variable is set to Region.
• Use the processing variable
[Current_Value] as the variable value if it resolves to a valid value for the refresh variable. In this case, the value of the variable changes dynamically for each pass.• Because the variable IDs are not exposed on the report, this feature is primarily useful for product developers to deliver a pre-configured Scheduler job with a product.
